If you’re a baking enthusiast or someone who loves indulging in light and airy desserts, you’ve probably come across angel food cake. This heavenly treat is known for its delicate texture and spongy crumb, making it a favorite for many. To achieve the perfect angel food cake, it’s important to have the right tools, and the angel food cake pan plays a crucial role.
What is an Angel Food Cake Pan?
An angel food cake pan, also known as a tube pan, is a specialized baking pan designed specifically for making angel food cakes. It features a tall and narrow tube in the center, surrounded by a wide, flat bottom and high sides.
The tube promotes even baking and allows the cake to rise and bake uniformly, resulting in the characteristic light and airy texture.
Types of Angel Food Cake Pans
There are a few different types of angel food cake pans available in the market. Let’s take a look at the most common ones:
1. Traditional Aluminum Pan
The traditional angel food cake pan is made of aluminum, which is an excellent conductor of heat.
These pans are durable, lightweight, and provide even heat distribution, ensuring your cake bakes evenly. However, they require greasing and flouring to prevent the cake from sticking to the sides.
2. Non-Stick Pan
Non-stick angel food cake pans are coated with a layer of non-stick material, usually made of silicone or a non-toxic polymer.
This coating allows the cake to release easily from the pan without greasing and flouring. Non-stick pans are convenient and make the cleaning process much easier.
3. Silicone Pan
Silicone angel food cake pans are gaining popularity due to their flexibility and non-stick properties. They are made of food-grade silicone, which is heat-resistant and provides excellent release. These pans are also easy to clean and store.
Choosing the Right Angel Food Cake Pan
When selecting an angel food cake pan, consider the following factors:
Size and Capacity
Angel food cake pans come in various sizes and capacities. The most common sizes are 9-inch and 10-inch pans.
Consider the number of Please note that I’m an AI language model and my responses are generated based on patterns and examples from the data I’ve been trained on.
I’ll continue generating the content for your article on “How to Use an Angel Food Cake Pan” based on the outline provided.
Size and Capacity
Angel food cake pans come in various sizes and capacities. The most common sizes are 9-inch and 10-inch pans. Consider the number of servings you intend to make and ensure that the pan can accommodate the amount of batter needed.
Material and Durability
Pay attention to the material of the pan. Aluminum pans are durable, lightweight, and provide even heat distribution. Stainless steel pans are also a good option as they are sturdy and resistant to rust. Choose a pan that will withstand frequent use and last for a long time.
Non-Stick Coating
If convenience is important to you, opt for a non-stick angel food cake pan. These pans have a coating that prevents the cake from sticking, allowing for easy release and cleanup. However, keep in mind that non-stick pans may require special care to maintain their coating.
Preparing the Angel Food Cake Pan
Before using your angel food cake pan, it’s essential to prepare it properly to ensure that the cake doesn’t stick to the pan. Here’s how you can do it:
Greasing the Pan
If you’re using a traditional aluminum or stainless steel pan, it’s necessary to grease it before adding the batter. Use a brush or paper towel to evenly coat the inside surface of the pan with a thin layer of vegetable shortening or melted butter. Make sure to reach all the crevices and the tube in the center.
Dusting with Flour
After greasing the pan, lightly dust it with flour. This helps create a barrier between the cake batter and the pan, further preventing sticking. Rotate the pan and tap out any excess flour.
Mixing the Angel Food Cake Batter
The success of your angel food cake depends on the proper mixing of the ingredients. Here’s a step-by-step process for achieving a light and fluffy batter:
Ingredients Needed
- 1 ½ cups egg whites (approximately 10-12 large eggs)
- 1 ½ cups granulated sugar
- 1 cup cake flour
- 1 ½ teaspoons cream of tartar
- 1 teaspoon vanilla extract
- ¼ teaspoon salt
Step-by-Step Mixing Process
- Separate the egg whites from the yolks, ensuring no traces of yolks are present. Room temperature egg whites are easier to beat, so allow them to sit for about 30 minutes.
- In a large mixing bowl, combine the egg whites and cream of tartar. Beat on medium speed until foamy.
- Gradually add the sugar, about 2 tablespoons at a time, while continuing to beat the mixture. Increase the speed to high and beat until stiff peaks form.
- In a separate bowl, sift together the cake flour and salt.
- Gently fold the sifted flour mixture into the beaten egg whites in three additions. Use a spatula and a light hand to prevent deflating the batter.
- Finally, fold in the vanilla extract until the batter is well combined.
Baking the Angel Food Cake
Now that you have your angel food cake batter prepared, it’s time to bake it to perfection. Follow these steps for a successful baking process:
Preheating the Oven
Preheat your oven to 325°F (163°C). It’s crucial to preheat the oven adequately to ensure even baking and proper rise of the cake.
Pouring the Batter into the Pan
Gently pour the batter into the prepared angel food cake pan. Fill the pan evenly, ensuring that the batter reaches all corners and fills the tube in the center. Smooth the top of the batter with a spatula to create an even surface.
Baking Time and Temperature
Place the filled angel food cake pan in the preheated oven and bake for approximately 45-55 minutes or until the top of the cake turns golden brown and a toothpick inserted into the cake comes out clean.
Keep in mind that baking times may vary depending on your oven and the size of the pan. It’s important to avoid opening the oven door during the initial stages of baking to prevent the cake from collapsing.
Cooling and Removing the Angel Food Cake
Once the angel food cake is baked to perfection, it’s crucial to cool it properly before removing it from the pan. Follow these steps for a successful cooling and removal process:
Cooling Upside Down
Immediately after removing the cake from the oven, invert the pan upside down. Most angel food cake pans have built-in legs or a raised rim on the edges to elevate the pan when placed upside down. This position helps the cake cool and prevents it from collapsing as it cools.
Allow the cake to cool completely in this inverted position. It usually takes around 1-2 hours for the cake to cool adequately.
Loosening the Cake from the Pan
Once the cake is completely cooled, gently loosen the sides and center tube of the cake from the pan using a long, thin spatula or a knife. Be careful not to damage the delicate cake structure.
Inverting and Releasing the Cake
Carefully invert the pan onto a serving plate or a wire rack. The cake should release easily due to the greased and floured pan. Give the pan a gentle tap or shake to help the cake release if needed.
Decorating and Serving the Angel Food Cake
Now that your angel food cake is beautifully baked and released from the pan, it’s time to add some final touches and present it in an enticing way:
Frosting and Toppings
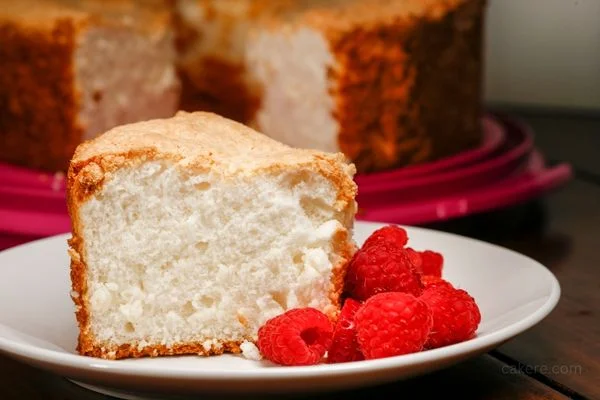
Angel food cakes are often served with a light frosting, such as whipped cream or a fluffy meringue. You can also add fresh berries, sliced fruit, or a dusting of powdered sugar as toppings. Get creative with your decorations to enhance the visual appeal of the cake.
Presentation Ideas
Consider serving the angel food cake on a decorative cake stand or a dessert plate. You can garnish the serving plate with edible flowers or mint leaves to add a touch of elegance. Slicing the cake into uniform pieces and using a cake server or a serrated knife for clean cuts will elevate the presentation.
Cleaning and Storing the Angel Food Cake Pan
Once you have enjoyed your delicious angel food cake, it’s important to clean and store the pan properly to maintain its quality:
Hand Washing vs. Dishwasher
Most angel food cake pans are not dishwasher safe. It’s recommended to hand wash the pan using warm, soapy water and a soft sponge or dishcloth. Ensure thorough cleaning, especially around the tube and the crevices of the pan. Avoid using abrasive scrubbers or harsh cleaning agents that may damage the pan’s surface.
Proper Storage to Maintain Quality
After cleaning and drying the angel food cake pan, store it in a cool and dry place to prevent any moisture or odors from affecting the pan.
You can place a piece of parchment paper or a clean cloth between the pan and its removable bottom or tube to prevent scratching or sticking.
Tips for Successful Angel Food Cake Baking
Here are some additional tips to help you achieve perfect angel food cakes every time:
- Ensure there are no traces of egg yolks in the egg whites, as even a small amount can affect the volume and stability of the cake.
2. Use room temperature egg whites, as they whip up better and create more volume.
- Sift the cake flour before measuring to ensure a light and airy texture.
- Be gentle when folding the flour into the beaten egg whites to avoid deflating the batter.
- Avoid overmixing the batter, as it can lead to a dense and heavy cake.
- Follow the baking time and temperature recommendations closely to prevent under or over baking.
- Allow the cake to cool completely before removing it from the pan to prevent it from sticking or collapsing.
- Use a serrated knife or a cake slicer to cut the angel food cake for clean and even slices.
- Experiment with different flavors by adding extracts like lemon, almond, or coconut to the batter.
- Practice patience when baking angel food cakes, as they require proper cooling and handling for the best results.
FAQs
No, an angel food cake pan is specifically designed for this type of cake and is necessary to achieve the desired texture and structure.
The cake is done when it turns golden brown and a toothpick inserted into the center comes out clean.
Cream of tartar helps stabilize the egg whites and gives the cake its characteristic texture. It’s best not to omit it, but you can use a small amount of lemon juice or vinegar as a substitute.
Conclusion
Using an angel food cake pan is essential for creating a light, airy, and delicious cake. By choosing the right pan, properly preparing it, and following the steps for mixing, baking, and releasing the cake, you can achieve bakery-worthy results.